
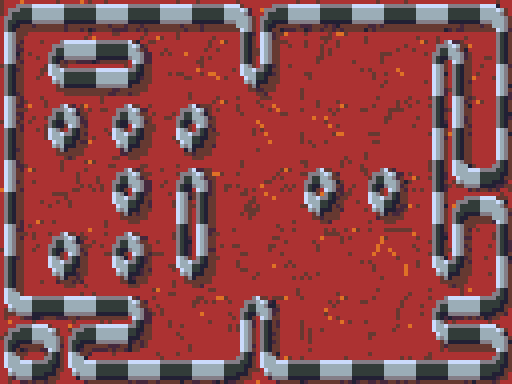
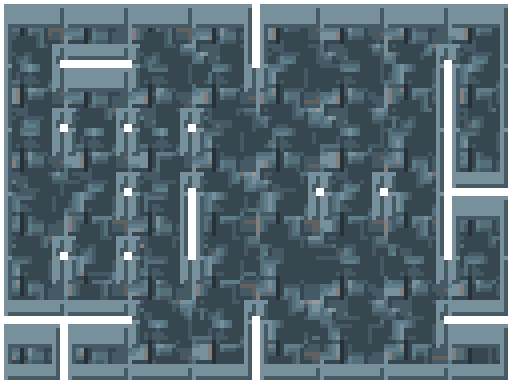
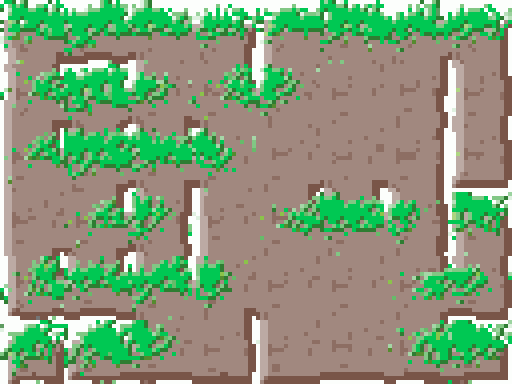
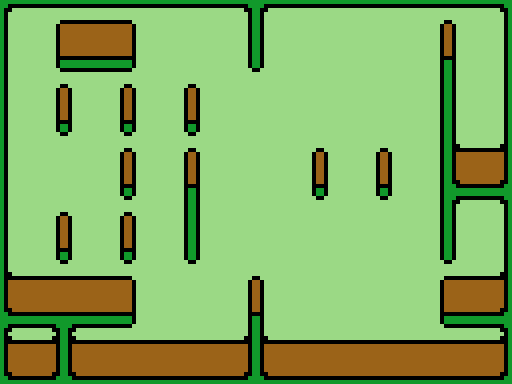
Tileset Alchemy
Tileset Alchemy
Make your own tilesets by combining a slew of procedural components.
Features
- Smart shapes that draw tiles based on their neighbors
- Rich set of procedural shapes and filters
- Full nested layer support
- Pixel perfect
- Supports any tile dimensions
- Plenty of examples to play around with
- Set up different variants of the same tileset
Manual
General
Tilesets are created by a series of directives that draw to or change the canvas in various ways. There are flat shapes that are drawn only on the edges and corners of tiles, there are elaborate patterns, and there are filters that change the colors or positions of already drawn pixels.
These directives are organized in layers, that can be blended together with various alpha values and compositing operations.
Some fields are marked as accepting 4 values. This is similar to how some CSS properties can have up to 4 values to affect different edges of an element. Like CSS, if one value is specificied, it gets applied to all sides. For 2 values, it gets applied to top/bottom and left/right. 3: top, left/rigth, bottom. 4: Top, right, bottom, left.
Document options
- Name: The name of the document
- Tile width/Tile height: The dimensions of each tile. Any dimension are supported
- Variants: When set to a value greater than 1, multiple copies of the tileset is drawn. This can be combined with layers that are marked as only being present in some variants, and random patterns that are drawn differently for each variation
- Space between tiles: Separate the drawn tiles with a number of pixels. Useful for seeing which tile is which
Import/export
You can import and export the tileset document as JSON, which can be useful if you want to save a copy for later. You can also export the tileset as a PNG, which can then be used in whatever game engine you're using.
Examples
There are a set of examples meant to illustrate how to create various kinds of tilesets and effects. You can use these as a starting point to make your own tiles, or to learn how different directives can be combined.
Layer options
- Alpha: The transparency of the layer. 100 means fully opaque, 0 means invisible.
- Blending: How this layer is combined with the existing pixels. See [https://developer.mozilla.org/en-US/docs/Web/API/CanvasRenderingContext2D/globalCompositeOperation]
- Variants: A series of checkboxes that control if a layer should be drawn for a particular variant. The document needs to have more than one variant for this to make sense.
- Isolate layer: Draw only this layer. Useful to see what's going on with a particular part of the document before it gets blended together with everything else
- Paste into: Paste whatever is on the clipboard to the top of this layer
Child options
- Paste after: Paste whatever is on the clipboard below this directive
- Copy: Copy the directive to the clipboard
- Cut: Copy the directive to the clipboard, then delete it
- Move to top: Move the directive to the top of the current layer
- Move up: Move the directive up one position in the current layer
- Move down: Move the directive down one position in the current layer
- Move to bottom: Move the directive to the bottom of the current layer
- Delete: Delete the directive
Directives
Layer
Flat shapes
Flat shape
A basic background that fills the whole tile with a single color.
Flat edge
Smart edges that only show up where a tile has an edge.
Flat convex corner
Draw a box wherever a tile has a convex corner
Flat concave corner
Draw a box wherever a tile has a concave corner
Flat concave corner edge
Smart edges that only show up where a tile has a concave corner. This is meant to complement the Edge directive, but is kept as a separate directive to give more control over how shapes are drawn in different circumstances.
Rims
Solid rim
Like a flat edge, but also supports inner and outer radii for round rectangle shapes.
Solid concave rim
Like the flat concave corner edge, but also supports rounded corners.
Filters
Trim edge
Remove pixels on the edges of tiles.
Trim concave edge
Remove pixels on the concave corners of tiles.
Offset
Shift the tile by a number of pixels. Wrapping can be enabled to keep repeating patterns intact. There is also an option to keep the original pixels in place.
Noise distort
Shift pixels around by a random amount. Lower scales make for a more smooth offset, while higher scales make it more fine grained. The magnitude controls how far pixels are moved. Wrapping can be used to keep repeating patterns intact. Individual randomization can be applied to make every tile unique. Per variant randomization can be applied to make every variant unique.
Greyscale
Change the color of each pixel to the corresponding greyscale value.
Gaussian blur
Apply a blur. Wrapping can be used to keep repeating patterns intact.
Dither greyscale
Convert the color to greyscale, then apply a dither pattern to only draw black or white pixels.
Palette
Convert each pixel color to the closest one from a selected palette.
Levels
Control the brightness values of each pixel. One useful trick with this is to set the high and low values to the same value to separate the image into only black and white pixels, above a certain threshold.
Color ramp
Convert the pixels to greyscale, then map the grey value to a range of colors between the two selected ones. Color mode affects how colors are interpolated. For example, when interpolating between red and green, HSV will make yellow colors appear.
Advanced color ramp
Same as above, but allows a third color to be added, and positioned at a custom position.
Edge detection
Find the edges of the pixels and draw them.
- Distance: The number of pixels the edge should be
- Edge type: Determines what counts as the "outside" for edge detection. For example, to find the edges of a box surrounded by transparent pixels, "Low alpha" will treat the box as the inside and the transparent pixels as the outside, and draw the edge at the edge of the box.
- Threshold: The cutoff value that determines whether something is "high" or "low"
- Direction: Simulate light direction. Edges on the side of the light will be drawn as white (before blend factor is applied), and pixels on the oppsite side will be drawn as black. Selecting None will make all detected pixels black, and All will make all pixels white.
- Blend factor: Determine how much of the light value will be blended in. Useful for creating softer lighting.
- Tile edge: How to treat pixels on the tile edge. Clamp will assume the pixels extend out, which is useful for details. Wrap will assume there is a repeating pattern. Force edge will always draw the edge for each tile, and Skip edge will never draw it.
- Smooth: Make shadow corners diagonal
- Clear: Discard the underlying pixels and ONLY draw the edge
Patterns
Brick
Draw a basic brick pattern
Checker
Draw a basic checker board
Gradient
Draw a basic gradient
Noise
Draw simplex noise. The scale determines how fine grained the pattern is, with lower values giving more round shapes. If per variant is selected, each tileset variant will get its own pattern.
Voronoi
Place a number of random points and draw the distance to them as a greyscale value. The metric determines how that distance is calculated (Euclidean: circles, Manhattan: Diamonds, Chebychev: Squares). Magnitude can be used to adjust the pattern brightness. If per variant is selected, each tileset variant will get its own pattern.
Wave
Combine a gradient pattern and a noise distort to create various wave patterns. If per variant is selected, each tileset variant will get its own pattern.
Math
Map RGB
Calculate new red, green, blue and alpha values based on the old ones, using a custom math expression for each. Also avaiable are the x and y coordinates, which can be used to make various gradient effects.
Map coordinates
Specify a custom expression where each pixel should be sampled from, to distort the image. Wrapping can be used to keep repeating patterns intact.
Stash
Stash
Store the current set of pixels into a named buffer, that can be used later. Useful for complex patterns that need a lot of individual processing applied to them later, like edge detection and shadows and coloring.
Recall
Recall a previously stored pattern by the name specified.
Leave a comment
Log in with itch.io to leave a comment.